


Free Click & Collect
Within One Hour

Reading time: 4 minutes
Decking can really lift the look of any garden, but after a few years of weather and wear, timber boards often need a bit of care. Which brings up a common question: can you sand a deck?
The short answer is yes - sanding the deck is often the best way to restore its surface, whether you're preparing for a fresh coat of decking oil or tackling stubborn stains and splinters. The key is knowing how to do it properly, with the right tools and approach.
This guide will take you through how to sand a deck step by step and offer some tips to help you get the best results. If you need tools or materials for decking sanding, Travis Perkins has everything from sandpaper for sanding deck surfaces to sealers and protective oils.
There are several good reasons for sanding the deck:
It removes rough patches and splinters, making the surface safer to walk on.
It prepares the timber for painting, staining, or sealing, helping new finishes stick better.
It helps to even out faded or patchy areas caused by sun, rain or algae.
It can extend the life of your decking (when combined with good maintenance).
So, if you're wondering how to sand a deck, read on as it’s not as hard as you might think.
Like most DIY tasks, the key to sanding decks is good preparation and choosing the right equipment for the job.
Before you start sanding the deck:
Inspect the boards and repair or replace any loose or damaged sections.
Give the decking a good clean. A pressure washer can help remove dirt, algae and old finishes, but let the boards dry completely before sanding (this can take up to 48 hours).
Clear the area you intend to work on and remove furniture, pots and anything else that may obstruct you.
To sand the deck effectively, you’ll need:
Usually starting with 60–80 grit for removing old paint or stain, moving to finer grits (80–100) for smoothing imperfections and finishing with a fine grit (120-220).
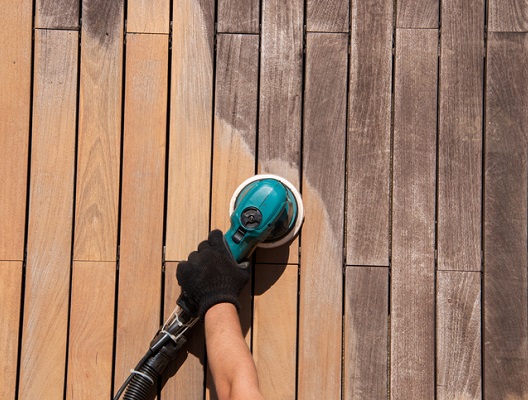
An orbital sander or a purpose-built floor sander will make light work of large areas. If you don’t want to buy an electric sander, no problem - you can hire an orbital sander by the day from Travis Perkins.
For edges, railings and corners where machines won’t reach.
Dust mask, eye protection and gloves.
At Travis Perkins, you’ll find a wide range of sanding tools and sandpaper, so you can choose what suits your deck best.
When you start sanding the deck, it’s important to follow these steps:
1. Always work along the grain of the timber
2. Start with your coarse grit to remove old finishes and rough patches
3. Once the surface looks more even, switch to a finer grit to smooth the boards
4. Don’t press too hard. Steady passes will avoid gouging the timber
5. Sand railings, steps and edges by hand, taking care to follow the wood grain
When sanding decks, dust can settle in gaps and corners, so once the sanding is complete:
Vacuum or sweep thoroughly to remove dust.
Wipe down surfaces with a damp cloth if needed, allowing it to dry fully before applying finishes.
Pick a dry day for the job, as you will find that moisture in the wood will make sanding difficult.
Don’t oversand. You only want to smooth the surface, not thin out the boards.
If boards are badly warped or rotten, it’s usually better to replace them with new timber decking.

Once sanding the deck is complete, it’s the perfect time to protect the timber. Applying a suitable decking oil, stain or sealant will help keep out moisture and UV damage. With regular maintenance, your newly sanded deck will stay looking great for many more summers.
If your deck is showing signs of wear and tear, sanding is one of the simplest ways to restore it. With the right preparation, tools and finishes, you'll have the boards looking as good as new.
For everything you need, from sandpaper for sanding deck boards to protective finishes, visit your local Travis Perkins branch or browse our range online.