


Free Click & Collect
Within One Hour

Reading time: 8 minutes
Building a raised deck is a great way to make the most of space that otherwise would go unused, such as slopes and uneven areas. In general, installing decking has a lot of advantages; it can transform your garden area, adds value to your property, is low maintenance and is relatively cheap to install. Elevated garden decking is an excellent way to create an outdoor living space that can be used for both relaxing and entertaining.
Whilst local planning laws can be complex and vary from place to place, for the most part, you do not need to apply for planning permission for your decking provided that:
The decking is no more than 30cm above the ground.
Together the total area of all the extensions, decking and platforms don’t cover more than 50% of the garden area.
None of the decking or platform is on land near the front wall of the house.
Before you lift a hammer, think about important factors like where, how big, what style, and your budget for the deck. Choose the best spot by checking where it gets sun and shade in your yard. The size should fit your needs, whether you're hosting parties or just relaxing outside. Make sure the design matches your home and landscape. Below are a few things to consider before installing your garden decking:
Shade and privacy – if you decide to use a permanently shady spot, be prepared to clean the wood once a year to preserve the timber from dampness.
Excessive wetness – avoid very wet areas completely as this will eventually cause the wood to rot.
Immobile fixtures in the garden - features such as trees and posts that you will have to navigate around.
Before starting your project gather all the needed materials and tools, because knowing how to build decking requires having everything ready to save time and prevent interruptions. Knowing how to build a decking frame requires specific tools and materials to ensure the frame is robust and reliable.
Here’s a list of the tools you’ll need:
Here’s a list of the materials you’ll need:
Knowing how to make a deck starts with preparing the ground properly for a sturdy deck. Here's a step-by-step guide to ensure your deck's foundation is solid and enduring.
Begin by clearing the designated area of any debris, vegetation, or obstacles. Remove rocks, roots, and other materials that might interfere with the deck's foundation. Make sure the area is completely clear to create a smooth working environment.
Using stakes and builders' lines, mark out the exact dimensions and shape of your deck. This step is crucial, as accurate marking will guide the subsequent steps and ensure the deck is built to your specifications. Double-check measurements and angles to avoid any discrepancies.
Level the ground within the marked area for your raised decking frame. Use a shovel to dig out high spots and fill in low spots, ensuring the surface is as even as possible. This preparation is essential for building a decking subframe that will provide a stable base for the foundation posts and prevent future settling issues.
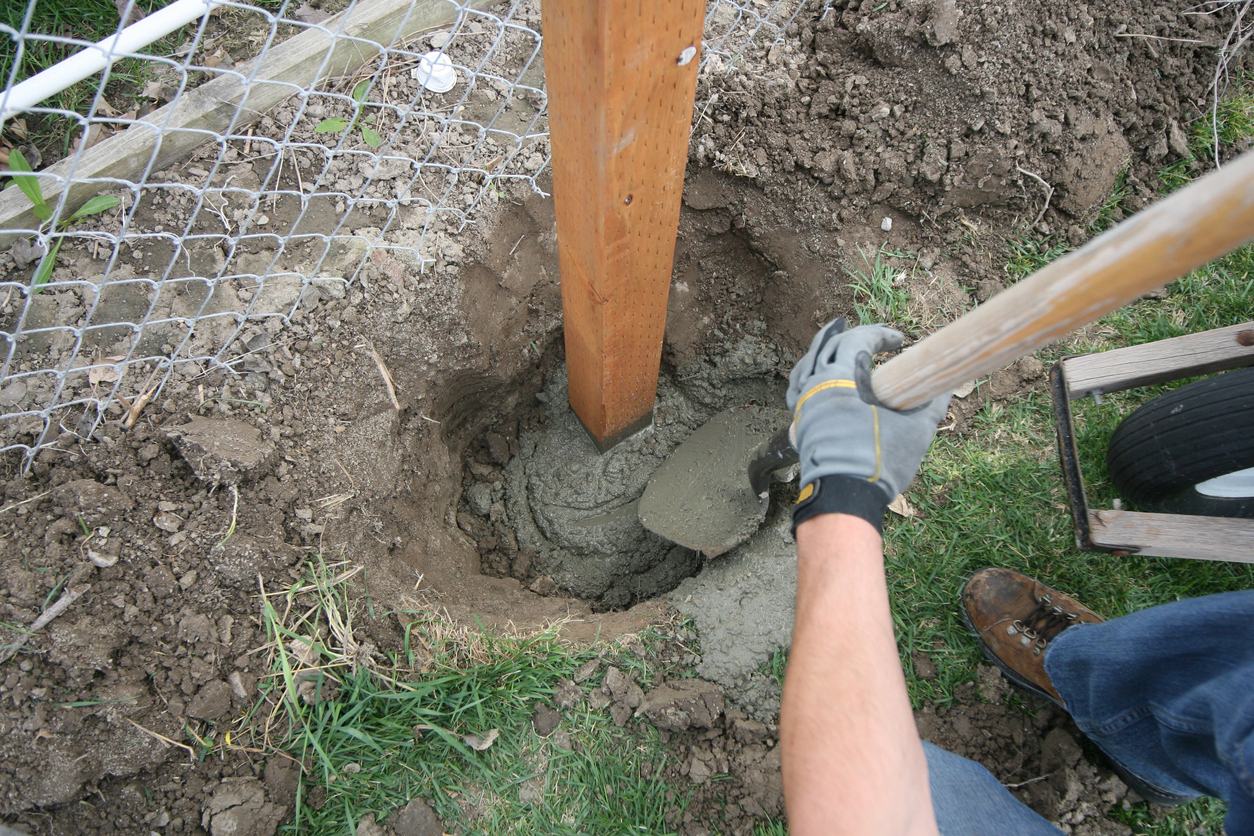
Following your layout markings, dig holes for the foundation posts. These holes should be deep enough to reach below the frost line, providing stability against ground movements. Generally, a depth of 30-36 inches is recommended, be sure to also check the manufacturer’s guidance for product-specific instructions.
Insert the foundation posts into the holes, making sure they are vertically aligned. Fill the holes with concrete up to ground level. Check the vertical alignment with a level. Let the concrete cure per the manufacturer's instructions, usually 24-48 hours.
Learning how to make a decking frame involves starting with constructing the frame for a sturdy, durable deck, which provides the foundation for stability and evenness over time. Gather treated timber and fasteners for lasting quality outdoors, where the frame is exposed to different elements. Here's how to install decking by building the frame:
Cut the perimeter boards to size and join them at the corners to form right angles.
Add internal boards for support, ensuring the frame is square by measuring diagonally.
Measure the space for your deck and cut the joists accordingly.
Use a saw to ensure precise cuts.
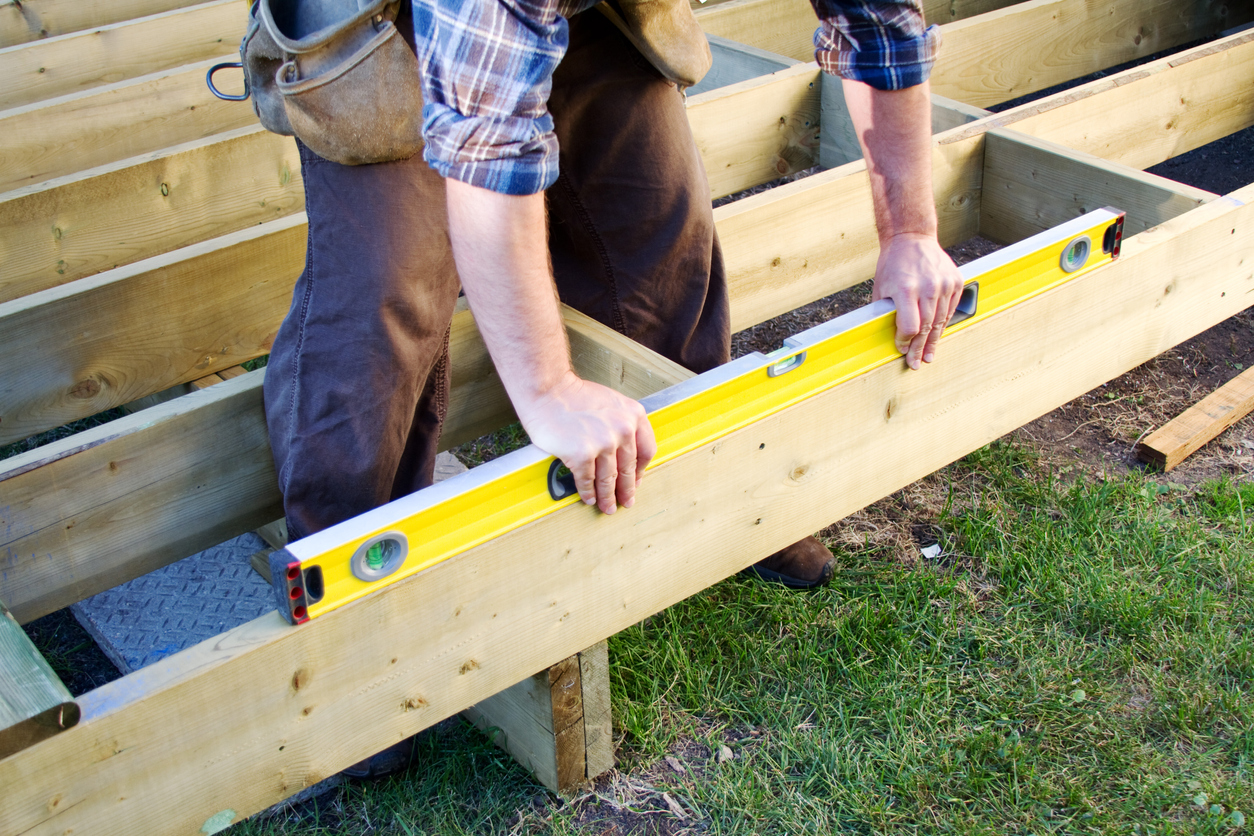
Lay out the joists on the foundation posts.
Ensure even spacing between each joist, typically 16 inches apart.
Use a spirit level to ensure the joists are perfectly level.
Adjust as necessary by adding shims.
Use weather-resistant screws or nails to secure the joists to the foundation posts.
Double-check that all connections are tight and secure.
Add blocking between joists to prevent them from twisting.
This adds additional stability to the frame.
Inspect the entire frame for any loose or uneven sections.
Make final adjustments to ensure everything is level and secure.
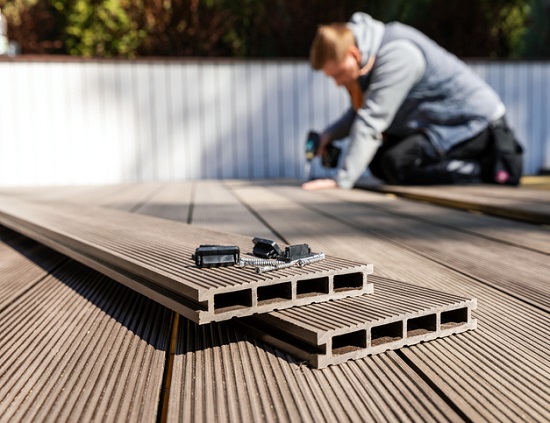
When considering different types of decking materials, composite decking is an excellent option for its durability and low maintenance. Proper spacing is also vital to accommodate wood expansion and ensure adequate drainage, preventing water accumulation that can lead to rot. Consider these tips for spacing and layout:
Expansion Gaps: Maintain a 5-6 mm gap between boards for wood expansion and contraction due to temperature changes.
Drainage: Ensure a slight slope (around 1-2 degrees) for water runoff, preventing standing water on the deck surface.
Patterns and layouts: Explore various patterns such as horizontal, diagonal, or herringbone for aesthetic appeal. Consider using contrasting colours or materials for a unique design.
Proper decking installation ensures longevity and functionality, providing a safe and comfortable surface for various activities. These steps are a guide for your decking installation and the manufacturer's instructions should give you specific instructions to your product.
Ensure the subframe is level and secure.
Lay weed control fabric over the ground to prevent weed growth.
Begin laying the first board at one end of the deck, perpendicular to the joists.
Use a spacer tool to maintain consistent gaps (around 5-6 mm) between boards for expansion and drainage.
Measure and cut the final board to fit snugly.
Secure the last board similarly to the others, ensuring all edges are aligned.
Use two decking screws per joist for optimal stability.
Pre-drill holes to prevent wood splitting, especially near the edges.
Progressively lay and secure each board, maintaining consistent spacing.
Use a rubber mallet to gently tap boards into place if needed.
Decking joists in the UK are typically spaced between 400mm to 600mm apart to ensure adequate support and structural integrity. The specific spacing depends on factors like the decking board type and expected load. Thicker boards may allow for wider spacing, while closer spacing might be needed for lighter boards to prevent sagging.
Consider the deck's usage when spacing joists. For decks with heavy furniture or large gatherings, closer joist placement is vital for weight distribution and stability. Proper joist spacing is crucial for deck durability and safety. Incorrect spacing can lead to structural failures, posing safety risks.
In conclusion, ensuring proper decking joist spacing and understanding how to install decking correctly is crucial for maintaining structural integrity and safety. Factors such as expected load and tailoring spacing based on deck usage are key considerations. Adding finishing touches such as railings, lighting, and regular maintenance like sanding and sealing are essential steps to enhance your deck's aesthetics and longevity. For additional inspiration and advice, check out our Garden and Landscaping Ideas.
To ensure your deck lasts, avoid placing it directly on the soil. This can cause drainage problems, erosion, and shorten the deck's life. Instead, create a strong base. Clear the area, lay weed control fabric, and use treated timber or composite for the subframe. This setup supports your deck and prevents rot.
Yes, you can build your deck with the right tools, materials, and understanding of the process. DIY deck projects are rewarding and cost-effective but need careful planning. Start by designing your deck and getting permits. Use quality materials within your budget and style. Follow safety guidelines and codes. If you're unsure, consider hiring a professional for tasks like the foundation or electrical work to ensure your deck is safe and solid.
We hope you’ve found this advice on raised decking construction helpful. You can check out more ideas and advice about gardens & landscaping right here. You can also find our guide on taking care of your wooden decking for top maintenance tips.
Disclaimer: The information contained on this page is intended as an overall introduction and is not intended as specific advice from a qualified professional. Travis Perkins aims to avoid, but accepts no liability, in the case that any information stated is out of date.
Always refer to the manufacturer's guidance and installation instructions.