


Free Click & Collect
Within One Hour

Reading time: 6 minutes
Selecting the right felt depends on the type of roof you intend to work on and its usage:
Torch-on roofing felt – A durable, professional-grade felt applied using a blowtorch to bond it to the surface. This type is typically used for flat roofs and should be installed by a qualified professional.
Shed roofing felt – Designed for lighter use on garden buildings, this felt is easy to handle and install, making it ideal for DIY projects like shed and outbuilding roofs.
Self-adhesive roofing felt – An easy-to-apply option that doesn’t require heat or nails. This type is perfect for small flat roofs or areas where using a torch isn’t practical or safe.
If in doubt, visit your local Travis Perkins branch, where our expert team can advise you on the best product for your job.
Before starting to felt your roof, it’s important to have the tools and materials you need at the ready. We suggest the following items to get you started:
Roofing felt
Roofing felt adhesive
Galvanised roofing nails or clout nails
Hammer
Stanley knife
Straight edge
Tape measure
Ladder (or scaffolding if required)
Safety gloves and goggles
Felting a shed roof is a task that many people can handle themselves, but it’s important to always follow the manufacturer’s instructions for the products you’re using. Here's the process to follow from start to finish:
Ensure the shed roof is clean and dry. Remove any old felt, debris, and fix or replace any damaged timber.
Measure the roof panels and allow extra for overhangs and overlaps to make sure you have enough felt.
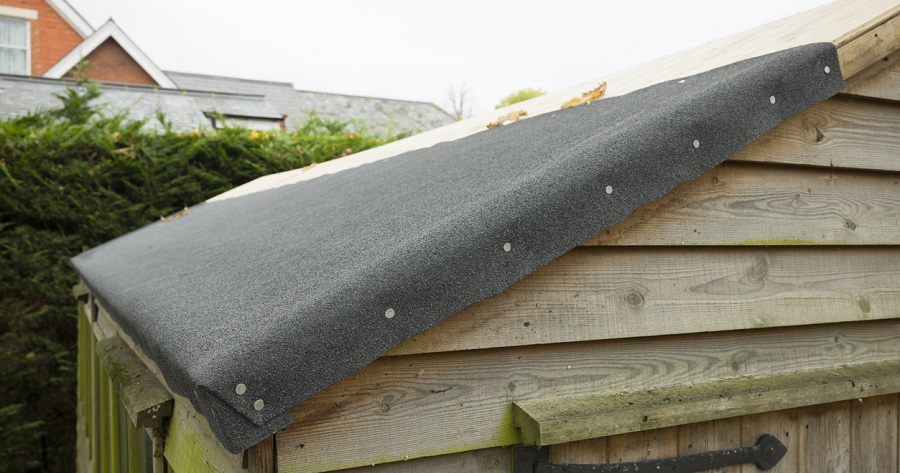
Roll out your garden shed roofing felt and cut lengths to size, allowing a generous overhang (approx. 50mm at the eaves, 75-100mm at gable ends).
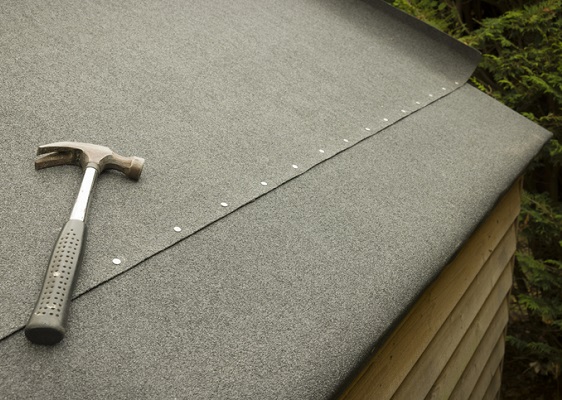
Lay the first strip at the lower edge of the roof and secure with galvanised nails every approx. 100mm along the edges and at overlaps.
Lay subsequent strips, overlapping by at least 75mm. Apply roofing felt adhesive between overlaps for extra waterproofing.
Neatly trim excess felt and fold over edges. Secure along the gable ends using timber fascia boards for a clean, weatherproof finish.
Flat roofs require greater care to avoid ponding and ensure a watertight finish. Before starting, always check that the roof structure is stable and safe to walk on, and do not attempt to felt a roof that’s weak or damaged.
This type of roofing typically uses a three-layer system for durability and weather resistance: a base layer, underlay, and a top cap sheet. Follow the steps below to install a felted flat roof:
Remove all old felt and debris. Inspect the timber deck for any rot or damage and replace any faulty boards.
Measure the full roof area, allowing extra for overlaps (around 75mm) and trimming edges.
Starting with the base layer, spread roofing felt adhesive evenly using a notched trowel or roller.
Before fitting, unroll the felt and leave it out flat for a short time to relax and make it easier to handle. Then lay the first layer carefully over the adhesive, smoothing out any air pockets. Allow for 75mm side and end overlaps.
Apply adhesive and lay the second (underlay) felt layer in the same way, staggering the joints to prevent weak points.
Finish with a final cap sheet — this is the top, weatherproof layer. Apply adhesive and roll it out, ensuring clean, secure overlaps.
Secure all edges using felt adhesive and edge trims or mechanical fixings where suitable, especially at roof edges.
Use a roller to press down all overlaps firmly. Consider using heavy-duty roofing felt for enhanced durability.
Felting a pitched roof is similar to felting a shed roof but requires a bit more care due to the angled surface. This method is suitable for small garden buildings or outbuildings with a pitched design.
Ensure the roof is clean, dry, and in good condition. Remove old felt and repair any damaged timber.
Measure each roof slope and add extra for overlaps (around 100mm) and overhangs at the eaves and ridge.
Cut your roofing felt into strips that match the roof length, allowing for overlaps at the ridge and sides.
Start at the eaves and work upwards. Lay the first strip along the bottom edge of one slope, fixing it in place with galvanised nails.
Lay the next strip above the first, overlapping by at least 100mm. Continue this pattern up to the ridge.
At the ridge, use a final strip of felt to cover the join between both sides, overlapping each side by at least 150mm.
Trim excess felt and fold neatly over the edges. Secure with timber fascia boards or fixings as required.
Inspect any felt roofs you own on an annual basis for any tears, lifting or signs of wear.
Promptly repair small defects using roofing felt adhesive or replace the felt where necessary.
Ensure edges and overlaps remain secure after storms or cold spells.
Ensuring that you apply your roofing felt correctly, to the manufacturers guidance and instructions, will help to protect your building from the elements, which will ultimately prolong its lifespan.
Whether you need roof felt for a shed, heavy-duty roofing felt for a flat roof, or adhesive and accessories, at Travis Perkins, we can help you obtain everything you need to get the job done.
Browse our full range of roofing felt products online or speak to your local branch team for expert advice.