


Free Click & Collect
Within One Hour

Reading time: 4 minutes
Roof flashing serves as a protective seal placed between the various joints and intersections across a property’s roof.
It should be fitted around any chimneys, skylights and vents installed onto a roof, as well as between joins on roof tiles and where the roofing meets a property’s walls.
Once in place, roof flashing will serve as a protective barrier to areas of a property that may be prone to leaks.
This is because the material, which can be applied in long sheets or in short and stepped sheets, can help to:
Direct water away from vulnerable areas of a property, such as chimneys, skylights, vents and walls.
Prevent water from seeping through a roof and into a property, risking significant structural damage.
Reduce the chances of a property suffering from moisture issues and problems caused by damp and mould.
Prevent pests and insects from finding their way inside a property.
Improve the energy efficiency of a property, with the tight seal that flashing forms reducing the amount of heat and air that leaks from interior rooms.
As flashing is used on so many parts of a property’s roofing, there are many different types of this material available.
The options you can choose from depending on the part of a roofing job that you are carrying out include:
Base flashing – This is the term used when multiple pieces of flashing are needed to make a structure watertight, such as when fitted around a chimney.
Counter flashing – Always used alongside base flashing, providing protection to the upper edge of the base flashing material.
Cap flashing – This will be used to stop water from pooling and causing problems on critical areas of a roof, such as one that has a skylight installed.
Continuous flashing – Otherwise known as apron flashing, this is where a single and long piece of the material is used on the part of a roof where it meets a vertical wall.
Drip tray flashing – Sometimes referred to as drip edges, this material is applied to the edges of a roof so that water can always be directed away from the fascia and not pool under a gutter or the property’s shingles.
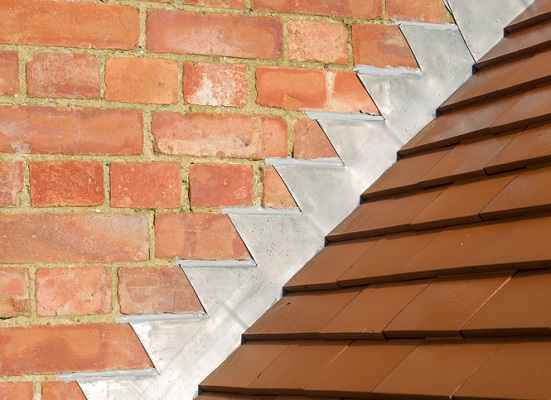
Step flashing – This type of flashing overlaps itself and is bent at a 90-degree angle, establishing a seal wherever a roof meets a side wall.
Valley flashing – You will fit this along the section wherever two sloped parts of a roof meet, to move water away and also prevent debris from building up on this type of property roofing.
Vent pipe flashing – Known by the term plumbing vent boot flashing, this cone-shaped material seals a roof’s ventilation pipes or vents to reduce the risk of leaks and draughts.
Follow these steps to fit flashing to a roof, while ensuring you always follow the manufacturer’s instructions and guidelines, to instantly protect a property from water damage, pest infestations and more:
1. Prepare the part of the roof being worked on by cleaning all debris away from the surface and removing any old flashing.
2. If there isn’t one already, apply a layer of waterproof felt to the underlayment of the roofing.
3. Fit your chosen type of roof flashing in a way that it lies flat against the underlayment that you have worked on in step two.
4. Use clout roofing nails, or lead flashing clips, also known as hall clips, if chasing, to secure the type of flashing fitted in place on a roof, putting any nails under the shingles and above the flashing material so that water cannot get through any nail holes.
5. Finish by spraying a hose pipe onto the part of the roof that you have been working on and then checking that none of the water has seeped through into a property.
Now that you know how and when to apply roof flashing, have you checked out our easy-to-follow guide to calculate the number of roof tiles needed for a project?
Disclaimer: The information contained on this page is intended as an overall introduction and is not intended as specific advice from a qualified professional. Travis Perkins aims to avoid, but accepts no liability, in the case that any information stated is out of date.
Always refer to the manufacturer's guidance for installation instructions and product maintenance.