





Free Click & Collect
Within One Hour

Reading time: 6 minutes
Block paving is a practical option for driveways, paths, access routes and landscaped areas where a low maintenance and long-lasting surface is needed. The quality of the finished job depends on more than the paving blocks themselves. Ground preparation, sub-base depth, drainage, edge restraints, laying pattern and compaction all need to be planned before installation begins.
The exact materials will depend on the size, use and ground conditions of the area you are working in, but most block paving installations need a similar set of materials.
This may include:
Paving blocks
MOT type 1 suitable sub-base material
Kerbs or edging jointing
Geotextile membrane
Plate compactor
For areas used by vehicles, the sub-base, edge restraints and compaction are especially important. These help support the surface and reduce the risk of movement or sinking over time.
Before installation begins, check the site layout, levels and expected use of the area. A block paving driveway may need different preparation compared to a pedestrian path or smaller spaced section.
Key points to check:
The total area to be paved
The condition of the existing ground
Drainage requirements
The edging and boundaries
Access to site for equipment and materials
The laying pattern
Whether the area will be used for vehicles
Planning the layout early can also help reduce unnecessary cuts and improve the final appearance. If the project needs more design guidance, the Travis Perkins patio paving layout ideas guide can help with pattern and layout inspiration.
Good preparation is one of the most important parts of laying block paving. The ground should be cleared of vegetation, loose material, old surfacing and debris. Any waste material should be disposed of in the correct way.
Once the area is clear, dig out the area to allow for enough depth for the sub-base, laying course and paving blocks. The depth required will depend on the ground conditions and how the paved area will be used.
The base should be firm and stable before the sub-base is added. Soft spots should be dug out and corrected, as movement in the ground can affect the finished paving.
The exact method may vary depending on the product and project specification, but most block paving installations follow a similar process.
Use string lines and setting-out pins to mark the paved area. Check the width, length, corners, curves and finished levels before excavation begins.
Surface falls should be planned so water moves towards a suitable drainage point and away from buildings where required.
Add MOT Type 1 or another suitable sub-base material in layers and compact it properly. A plate compactor helps create a firm, even base across the full area.
The sub-base should follow the planned levels and falls. Check regularly as the work progresses, as errors at this stage can affect the laying course and finished paving.
Edge restraints help keep the paving blocks in place and reduce movement at the edges of the surface. These may include kerbs, concrete edging or other suitable restraints.
The edges should be installed securely before the blocks are laid. This is particularly important for driveway block paving, where vehicle movement can place pressure on the outer blocks.
Spread sharp sand across the compacted sub-base to create the laying course. The sand should be levelled evenly to the required depth and not walked on once prepared.
Use screeding rails or a straight edge to create a consistent surface. The laying course needs to support the paving blocks evenly, so avoid dips, ridges or loose areas.
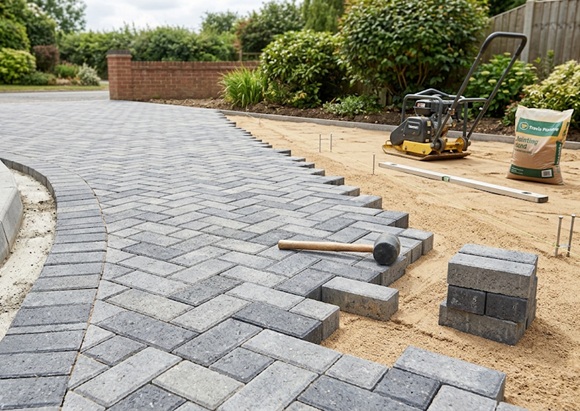
Start from a straight edge or fixed corner and lay the paving blocks in the chosen pattern. Work from the laid paving where possible to avoid disturbing the prepared sand.
Place the blocks close together, keeping the pattern consistent. Check alignment regularly with a string line, especially on longer runs or detailed driveway layouts.
For more general paving installation advice, we also have a guide to laying paving slabs, which may be useful when working across different hard landscaping areas.
Cuts may be needed around edges, drainage channels, inspection covers, entrances and changes in direction. Measure each cut carefully and use suitable cutting tools for paving blocks.
Smaller cut pieces should be avoided where possible, as they can be harder to secure and may affect the finished appearance.
Once the blocks are laid, brush kiln-dried sand into the joints. The surface should then be compacted so the blocks settle into place.
After compaction, more jointing sand may be needed to fill any gaps. The joints help lock the blocks together, so they should be filled properly before the area is opened for regular use.
A good block paving finish depends on accurate preparation, setting out and compaction.
Common mistakes include:
Not excavating to a suitable depth
Installing paving on soft or uneven ground
Using an unsuitable or poorly compacted sub-base
Not planning drainage before work begins
Leaving weak or unsupported edges
Walking on the prepared laying course
Allowing the laying pattern to drift
Using very small cuts at the edges
Not filling joints properly with sand
Opening the area to traffic too soon
Taking time to check each stage can help reduce rework and improve the finished surface.
Block paving should be checked and maintained to help keep the surface in good condition. Regular sweeping can help remove leaves, dirt and debris from the joints.
Jointing sand may need to be topped up over time, particularly after cleaning or heavy use. Also check for movement, dips or loose blocks, especially on driveways and high-use areas.
If individual blocks become damaged, they can often be lifted and replaced without disturbing the full surface. This is one of the practical benefits of block paving compared with some continuous driveway surfaces.
Yes, block paving can be used for driveways when installed with a suitable sub-base, secure edge restraints and correct compaction. The product and installation method should suit the expected vehicle use.
Block paving is usually laid over a compacted sub-base with a sharp sand laying course. The exact build-up will depend on the ground conditions, surface use and product guidance.
Yes, block paving usually needs secure edge restraints to help hold the outer blocks in place and reduce movement, especially on driveways.
Sharp sand is commonly used for the laying course, while kiln-dried sand is brushed into the joints after the blocks have been laid.
Sinking is usually reduced by preparing the ground properly, installing and compacting a suitable sub-base, creating an even laying course and supporting the edges correctly.
Laying block paving successfully starts with good preparation. The paving blocks, sub-base, laying course, drainage, edging and jointing all need to work together to create a stable and consistent surface.
For trade projects, plan the full installation before materials are ordered and check levels throughout the job. As a builder’s merchant, Travis Perkins offers a range of block paving, sub-base materials, sand, edging, drainage products and tools to support driveway block paving and hard landscaping projects.